섹션 1. 리액트 네비게이션
3강. 로그인 화면 만들기
칠드런이 하나만 오는 때가 생기는데, 그때는 Tab.Group을 사용해서 묶어주면 된다.
<Tab.Group></Tab.Group>
<T>
	<Children></Children>
	<Children></Children>
	<Children></Children>
</>
이렇게 프레그먼트로 묶어주는 것과 같은 이치다.
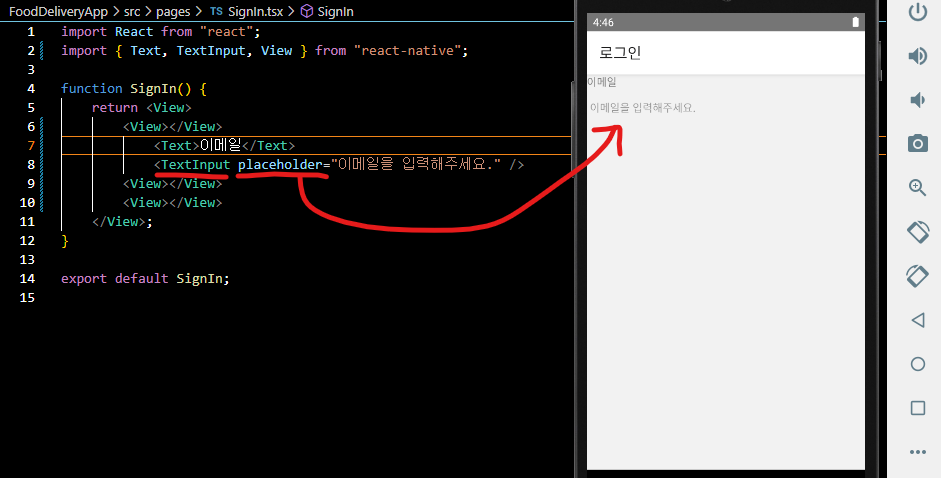
이렇게 쓰고 이메일을 입력하라는 부분을 누르면 키보드가 올라온다.

TextInput을 썼기 때문
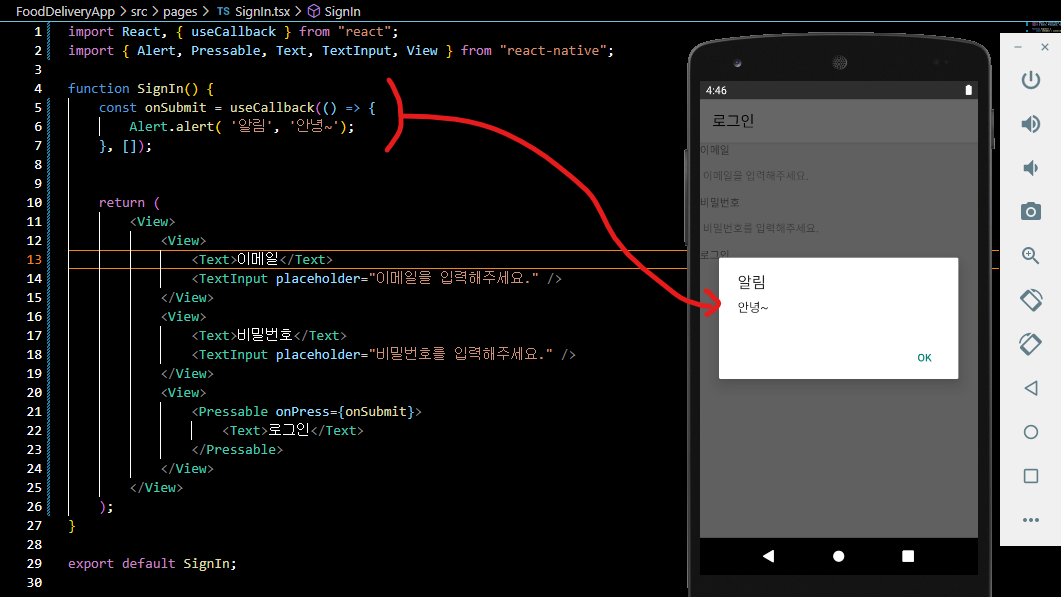
알림을 뜨게 만드는 Alert.alert
이제 꾸미기만 하면 된다.
import React, { useCallback, useState } from "react";
import { Alert, Pressable, StyleSheet, Text, TextInput, View } from "react-native";

function SignIn() {
    const [email, setEmail] = useState('');
    const [password, setPassword] = useState('');

    const onChangeEmail = useCallback((text) => {
        setEmail(text);
    }, []);
    const onChangePassword = useCallback((text) => {
        setPassword(text);
    }, []);

    const onSubmit = useCallback(() => {
        Alert.alert( '알림', '안녕~');
    }, []);

    const canGoNext = !email || !password; //변수명을 깔끔하게 지으면 다른 사람이 이해하기 쉽다. 좋은 코드의 조건
    return (
        <View>
            <View style={styles.inputWrapper}>
                <Text style={styles.label}>이메일(ID)</Text>
                <TextInput
                    style={styles.textInput}
                    placeholder="이메일을 입력해주세요."
                    onChangeText={onChangeEmail}
                />
            </View>
            <View style={styles.inputWrapper}>
                <Text style={styles.label}>비밀번호</Text>
                <TextInput
                    style={styles.textInput}
                    placeholder="비밀번호를 입력해주세요."
                    onChangeText={onChangePassword} />
            </View>
            <View style={styles.buttonZone}>
                <Pressable
                    onPress={onSubmit}
                    style={
                        canGoNext
                        ? styles.loginButton
                        : StyleSheet.compose(styles.loginButton, styles.loginButtonActive)
                    }
                    disabled={canGoNext}>
                    <Text style={styles.loginButtonText}>로그인</Text>
                </Pressable>
                <Pressable>
                    <Text>회원가입하기</Text>
                </Pressable>
            </View>
        </View>
    );
}

const styles = StyleSheet.create({
    inputWrapper: {
        padding: 20,
    },
    textInput: {
        padding: 5,
        borderBottomWidth: StyleSheet.hairlineWidth, // 보이는 것중에서 가장 얇은거
    },
    label: {
        fontWeight: 'bold',
        fontSize: 16,
        marginBottom: 20,

    },
    loginButton: {
        backgroundColor: 'gray',
        paddingHorizontal: 20,
        paddingVertical: 10,
        borderRadius: 5,
        marginTop: 10,
        marginBottom: 10,
    },
    loginButtonActive: {
        backgroundColor: 'blue',
    },
    loginButtonText: {
        fontSize: 20,
        color: 'white',
    },
    buttonZone: {
        alignItems: 'center',
    },
});

export default SignIn;
이렇게 쓰면 다음과 같이 나온다.
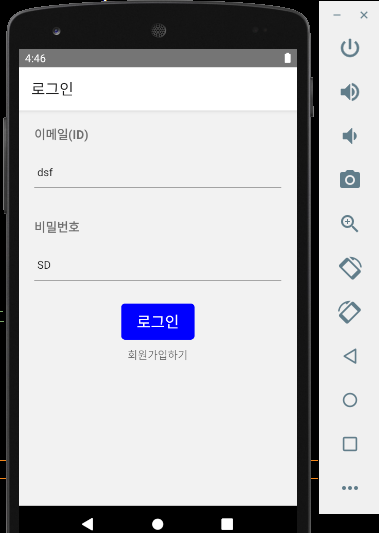
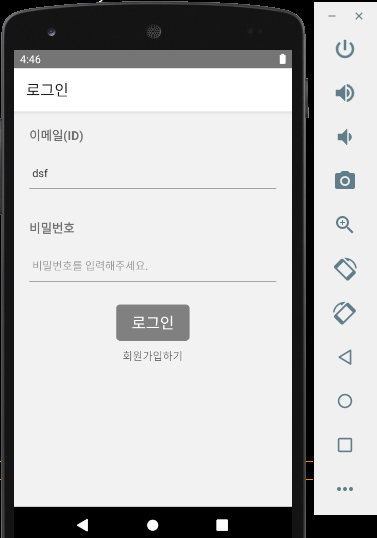
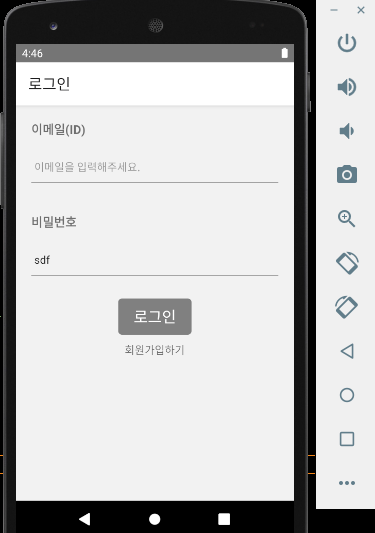
ID 또는 비밀번호가 입력되지 않으면 로그인 버튼이 회색으로 변한다.
4강. TextInput 사용하기
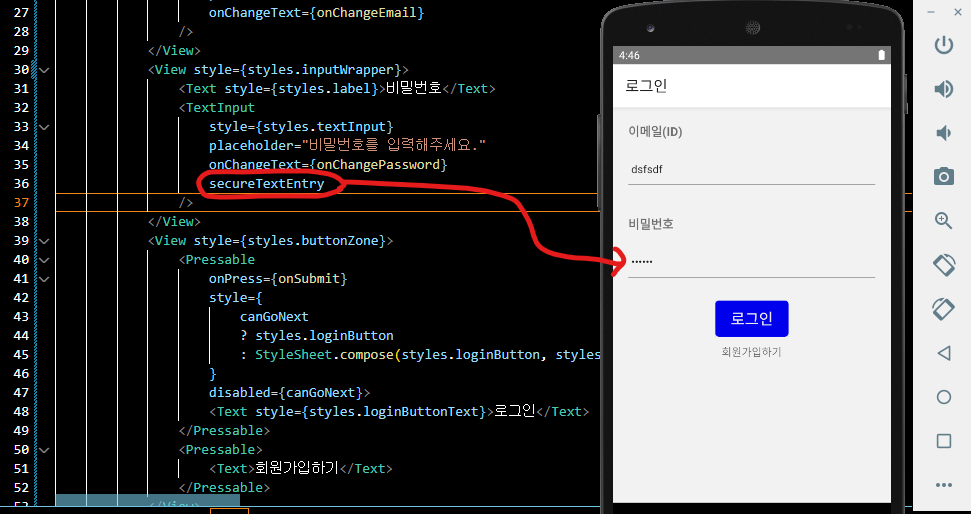
secureTextEntry 하면 비밀번호가 블러처리된다.
좀 더 확실하게 하려면 secureTextEntry={true}를 입력해 주면 된다.
boolean 타입이다.

TextInput에는 상당히 많은 옵션들이 있다.
다양한 옵션을 확인하려면 공식문서를 참조하면 된다.
요즘 인증문자 오면 자동으로 입력하는 OTP 같은 것도 잘 되어 있다.
https://reactnative.dev/docs/textinput#importantforautofill-android
TextInput · React Native
A foundational component for inputting text into the app via a keyboard. Props provide configurability for several features, such as auto-correction, auto-capitalization, placeholder text, and different keyboard types, such as a numeric keypad.
reactnative.dev
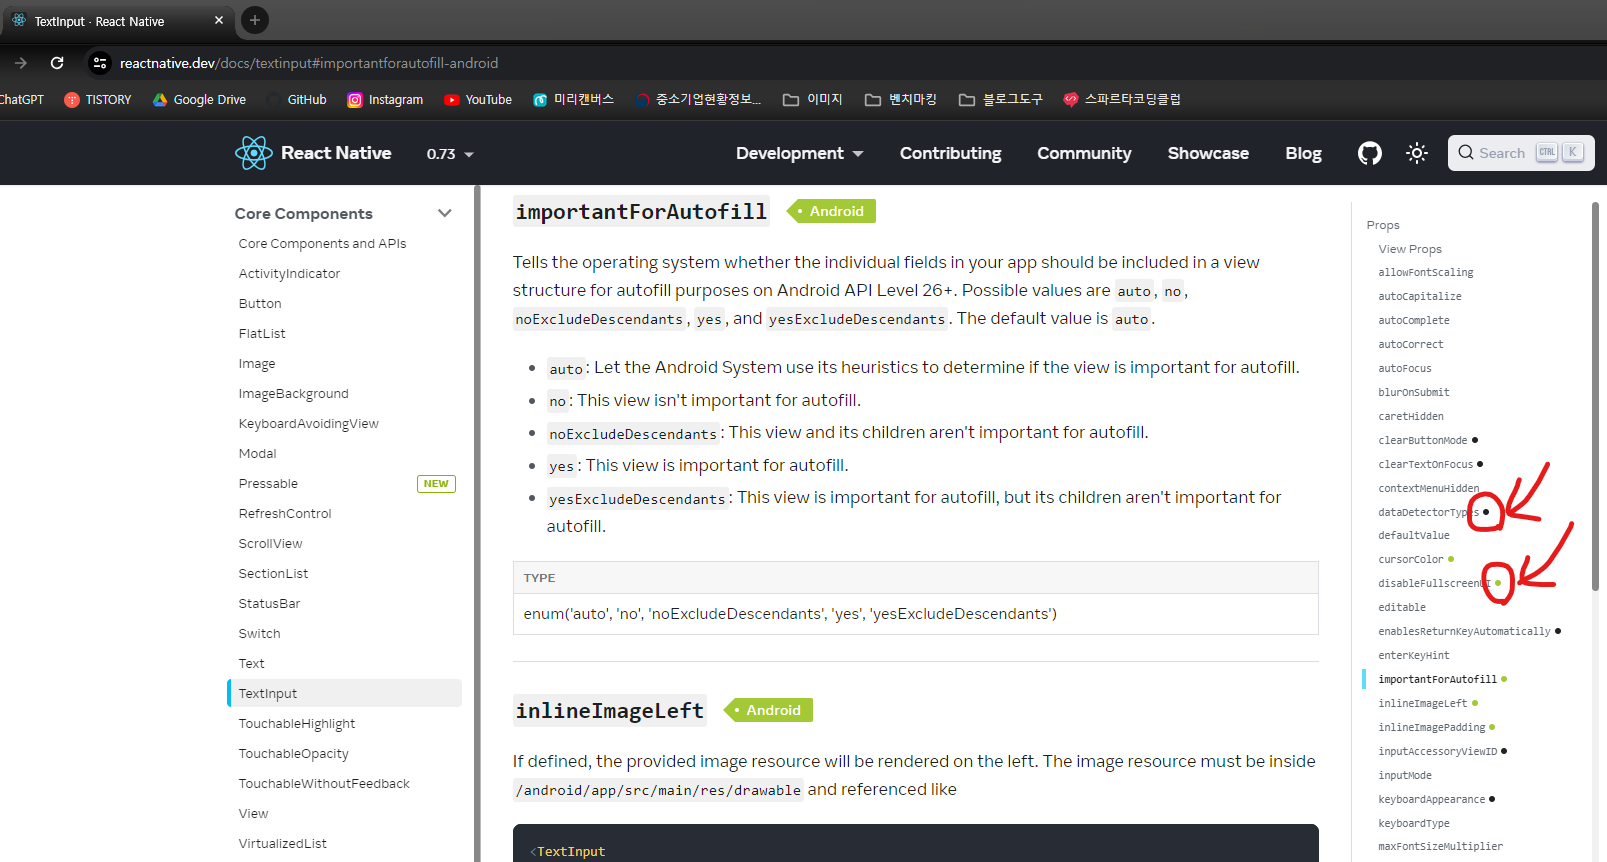
우측 점을 보면 안드로이드, IOS에서 적용되는 점들이다.
검은 점 : Android only
초록 점 : IOS only
그래서 둘 다 적용되는 것을 사용하려면 점이 없는 것을 사용하면 된다.
위의 공식 문서는 목록만 제공해 주고 어떤 역할인지까지는 나와있지 않아서 따로 구글링을 해야 한다.
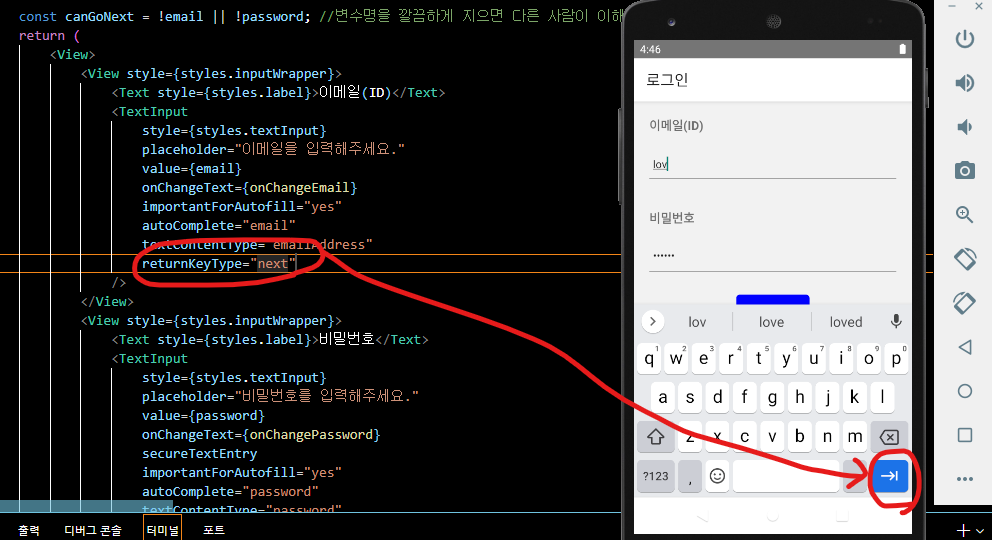
저런 화살표 모양도 다 바꿀 수 있다.
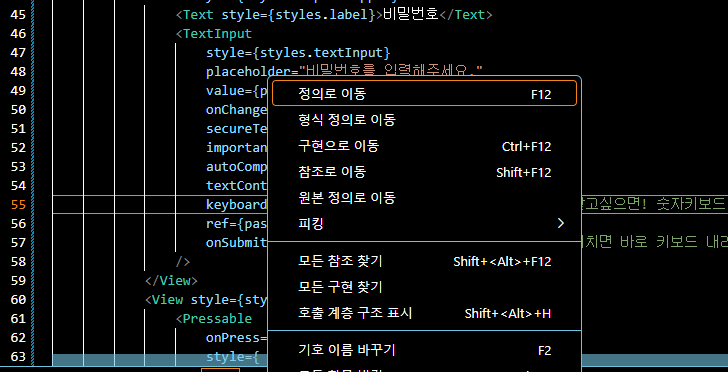
각 기능의 옵션들이 궁금하면 정의로 이동을 누른다.
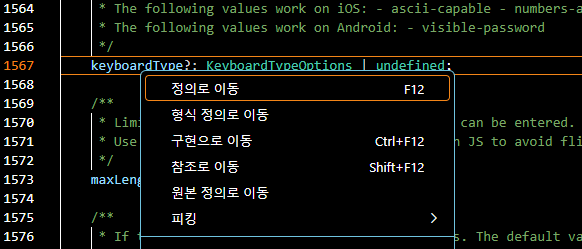
예를 들어, keyboardType이 있으면 어떤 옵션이 있는지 알기 어렵다. 그러면 정의로 이동한다음에

옵션들이 뭐가 있는지를 확인하면 된다.
decimal-pad는 숫자만 나와있는 패드를 의미한다.
import { NativeStackScreenProps } from "@react-navigation/native-stack";
import React, { useCallback, useRef, useState } from "react";
import { Alert, Pressable, StyleSheet, Text, TextInput, View } from "react-native";
import { RootStackParamList } from "../../App";


type SignInScreenProps = NativeStackScreenProps<RootStackParamList, 'SignIn'>;
function SignIn({ navigation } : SignInScreenProps) {
    const [email, setEmail] = useState('');
    const [password, setPassword] = useState('');
    const emailRef = useRef<TextInput | null>(null);  //generic
    const passwordRef = useRef<TextInput | null>(null);

    const onChangeEmail = useCallback((text) => {
        setEmail(text);
    }, []);
    const onChangePassword = useCallback((text) => {
        setPassword(text);
    }, []);

    const onSubmit = useCallback(() => {
        if(!email || !email.trim()) { //trim : 좌우공백 없애기
            return Alert.alert('알림', '이메일을 입력해주세요.');
        }
        if(!password || !password.trim()) {
            return Alert.alert('알림', '비밀번호를 입력해주세요.');
        }
        Alert.alert( '알림', '안녕~ 로그인 되었습니다~');
    }, [email, password]); //검증로직

    const toSignUp = useCallback(() => {
        navigation.navigate('SignUp');
    }, [navigation]);

    const canGoNext = !email || !password; //변수명을 깔끔하게 지으면 다른 사람이 이해하기 쉽다. 좋은 코드의 조건
    return (
        <View>
            <View style={styles.inputWrapper}>
                <Text style={styles.label}>이메일(ID)</Text>
                <TextInput
                    style={styles.textInput}
                    placeholder="이메일을 입력해주세요."
                    value={email}
                    onChangeText={onChangeEmail}
                    importantForAutofill="yes"
                    autoComplete="email"
                    textContentType="emailAddress"
                    keyboardType="email-address"
                    returnKeyType="next"
                    onSubmitEditing={() => {
                        passwordRef.current?.focus(); //밑에 passwordRef에 focus해준다는 것. 비밀번호칸으로 이동.
                    }}
                    blurOnSubmit={false} //키보드 내려감 방지
                    ref={emailRef}
                    clearButtonMode="while-editing" //아이폰에서만 적용, 우측에 X표시 떠서 누르면 없어지는거
                />
            </View>
            <View style={styles.inputWrapper}>
                <Text style={styles.label}>비밀번호</Text>
                <TextInput
                    style={styles.textInput}
                    placeholder="비밀번호를 입력해주세요."
                    value={password}
                    onChangeText={onChangePassword}
                    importantForAutofill="yes"
                    autoComplete="password"
                    textContentType="password"
                    keyboardType="default" //비밀번호를 숫자로만 받고싶으면! decimal-pad 숫자키보드 팝업
                    ref={passwordRef}
                    onSubmitEditing={onSubmit} //비밀번호 입력하고 엔터치면 바로 키보드 내려가게(엔터치면 하는 동작 지정, 사용성UP)
                    secureTextEntry={true}
                />
            </View>
            <View style={styles.buttonZone}>
                <Pressable
                    onPress={onSubmit}
                    style={
                        canGoNext
                        ? styles.loginButton
                        : StyleSheet.compose(styles.loginButton, styles.loginButtonActive)
                    }
                    disabled={canGoNext}>
                    <Text style={styles.loginButtonText}>로그인</Text>
                </Pressable>
                <Pressable onPress={toSignUp}>
                    <Text>회원가입하기</Text>
                </Pressable>
            </View>
        </View>
    );
}

const styles = StyleSheet.create({
    inputWrapper: {
        padding: 20,
    },
    textInput: {
        padding: 5,
        borderBottomWidth: StyleSheet.hairlineWidth, // 보이는 것중에서 가장 얇은거
    },
    label: {
        fontWeight: 'bold',
        fontSize: 16,
        marginBottom: 20,

    },
    loginButton: {
        backgroundColor: 'gray',
        paddingHorizontal: 20,
        paddingVertical: 10,
        borderRadius: 5,
        marginTop: 10,
        marginBottom: 10,
    },
    loginButtonActive: {
        backgroundColor: 'blue',
    },
    loginButtonText: {
        fontSize: 20,
        color: 'white',
    },
    buttonZone: {
        alignItems: 'center',
    },
});

export default SignIn;
최종코드
전체적으로 한번 다시 따라가면서 만들어봐야 정확하게 이해할 수 있을 것 같다.
이렇게 해서 실제 화면이 나오니까 재미가 붙기 시작한 게 가장 큰 수확이다.


